A To-Do List Using Spring Bot
Table of contents
This tutorial will take you through the process of creating a new Spring Bot application and running it inside the Symphony container. Note: the code for this bot will also work on Microsoft Teams, but you’ll have to follow the steps on the Teams Tutorial to make it work there too.
We’re going to build a “To Do” list with the following features:
- One to-do list per Symphony room/chat
- Anyone in the room can create a new item and add it to the list (potentially assigning the item to someone)
- Ability to edit the details of any item
- Bulk assign / remove / mark complete of items
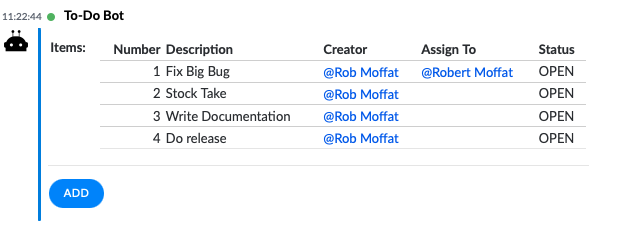
It’s going to look something like this:
If you want to cheat, you can view the code for this here.
Let’s go!
1. Create a New Spring Boot Project
Let’s head over to https://start.spring.io and create a new app
project:
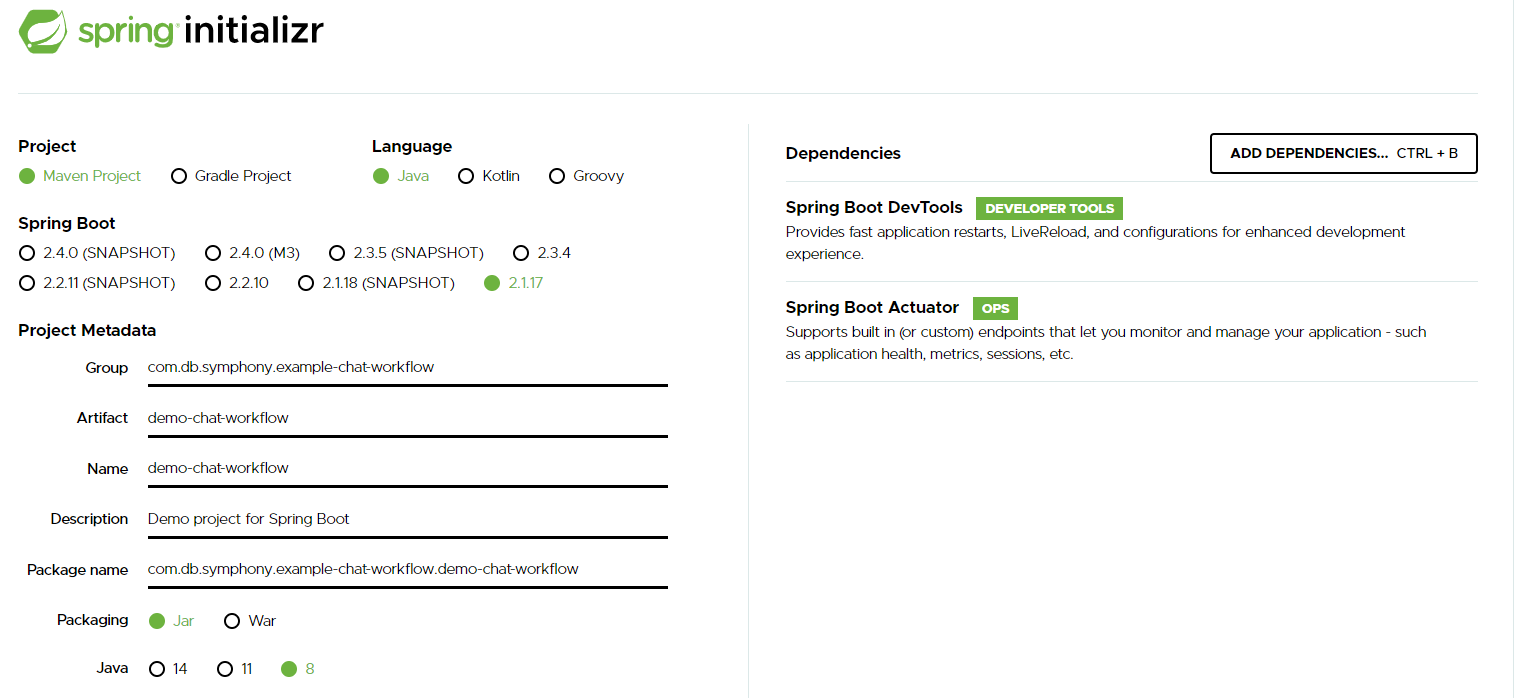
- I’ve created a maven project, with actuator and devtools support built in.
- When you click download, it will deliver a zip file which you can unpack in your file-system.
2. Import Into Your IDE
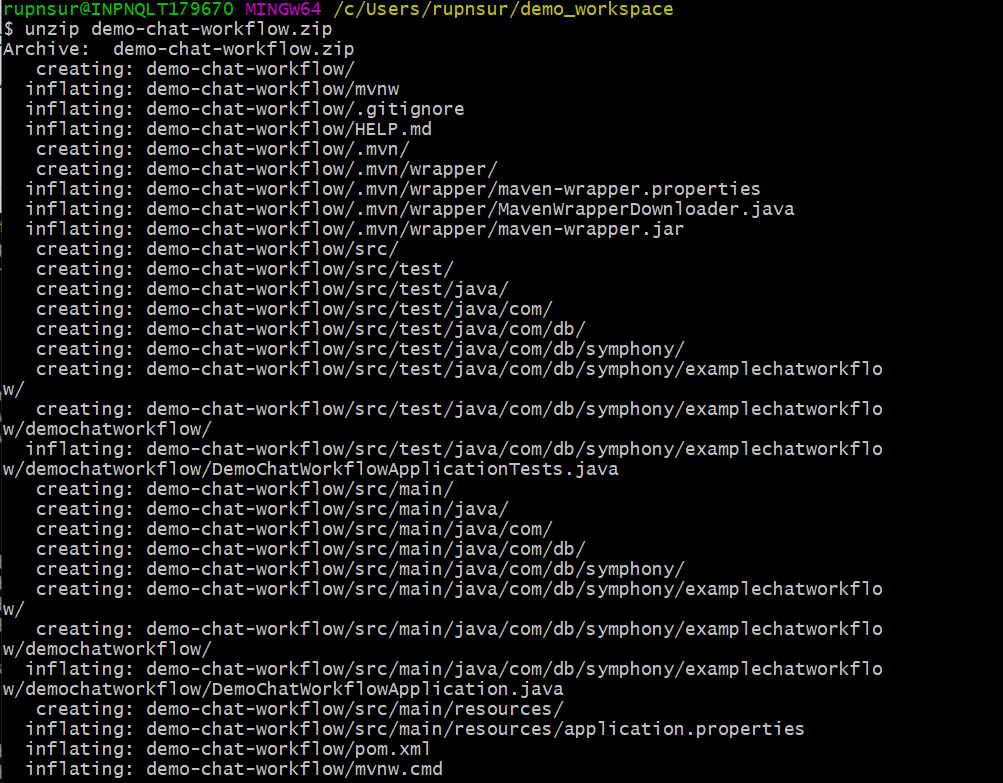
In this image, I’m downloading and unpacking Spring’s zip file. Next, I’m going to import the project into Eclipse, but If you are using a different IDE, substitute your step here.
Here is my project in eclipse:
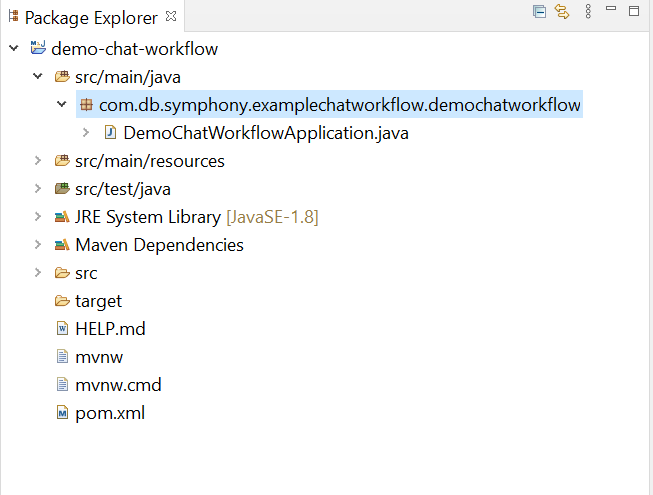
- If I run the project now, I should see Spring start, and then finish (as we haven't actually added any code).
3. Add The Symphony Dependencies
In pom.xml add these dependencies:
<dependency>
	<groupId>org.finos.symphony.toolkit</groupId>
	<artifactId>symphony-chat-workflow-spring-boot-starter</artifactId>
	<version>--latest version --</version>
</dependency>
<dependency>
  <groupId>org.apache.cxf</groupId>
  <artifactId>cxf-rt-rs-client</artifactId>
  <version>--latest version --</version>
  <scope>compile</scope>
</dependency>
Latest version:

4. application.yml
We need to tell the bot the endpoint URLs for the Symphony pod it’ll be running on, and the credentials for the bot. This is done in spring with the application.yml file.
We covered this in the Spring Boot Bot Building Tutorial
An example that you can customize is checked into the demo project here: application.yml
5. Some Beans
We’re going to create 3 simple Java beans:
ToDoList: This will be our main todo list bean. It will have a property containing a bunch ofToDoItemsToDoItems: Each item in theToDoListwill be one of these. It will have a description, creator etc.NewItemDetailss: This is a form containing two fields -descriptionandassignTo, and we’ll use this for capturing a newToDoItem.
ToDoList
@Work
public class ToDoList {

  private List<ToDoItem> items = new ArrayList<ToDoItem>();

  public ToDoList() {
    super();
  }

  public ToDoList(List<ToDoItem> items) {
    super();
    this.items = items;
  }

  // getter / setter
}
This is the entirety of ToDoList (for now). The @Work annotation, which provides a human-readable name and instructions for people editing the list. The ToDoList is essentially just a list of ToDoItems, so let’s look at those.
ToDoItem
@Work
public class ToDoItem {

  public enum Status {
    OPEN, COMPLETE
  };

  private Integer number;
  private String description;
  private User creator;
  private User assignTo;
  private Status status;

  // getters / setters / constructors
}
Some notes on this:
- As with
ToDoList, we add the@Workannotation, which indicates we will be sending this object as part of a Symphony message. Statusis going to keep track of whether theToDoItemhas been done or not.- To make it easy to refer to items, we’re going to give them all a unique
numberin theToDoList. This makes it easier to do the bulk operations later on in the tutorial. (You could choose some other way to refer to each item - a hash-tag would be good, for example). Useris a platform agnostic super-class, which in this case will use the concrete instance classSymphonyUser. We’ll be given a picker to choose these.
NewItemDetails
This is a simple POJO to capture the details of a new item. We capture the description of the item, and who to assign it to.
@Work
public class NewItemDetails {

  String description;
  User assignTo;

  // getters / setters
}
6. Creating The Controller
Let’s add a controller that allows us to:
- Ask the bot for a
NewItemDetailsform to fill in. - Adds a button to the
NewItemDetailsform to allow us to submit it. - Creates and returns a
ToDoListwith the newToDoItemin it.
@Controller
public class ToDoController {                                                                 (1)

  @ChatRequest(value="add", description = "Add an item")                                      (2)
  @ChatResponseBody(workMode = WorkMode.EDIT)                                                 (3)
  public NewItemDetails add1(User author) {                                                   (4)
    NewItemDetails out = new NewItemDetails();
    out.assignTo = author;                                                                    (5)
    return out;
  }

  @ChatButton(value = NewItemDetails.class, buttonText = "add")                               (6)
  public ToDoList add(NewItemDetails a, User u, Optional<ToDoList> toDo) {                    (7)
    ToDoList out = toDo.orElse(new ToDoList());                                               (8)
    out.getItems().add(new ToDoItem(a.getDescription(), u, a.getAssignTo(), Status.OPEN));    (9)
    return out;
  }
Some notes:
At (1) we are creating a Spring Controller. By annotating with @Controller, Spring will create this bean when it starts up.
On (2) we use the @ChatRequest annotation to tell Spring to call this piece of code when the user types /add to the bot. On line (3) we use the @ChatResponseBody annotation to tell Spring Bot to return a form, rather than just rendering the returned object for display.
At (4) we declare the method signature. Spring Bot will automatically populate the author parameter when the method gets called. That allows us to set the assignTo value at (5) of the NewItemDetails object we’re going to return.
At (6) we are creating the submit button for the form with the label add. When the user presses add at the bottom of the NewItemDetails form, we’re going to find the existing ToDoList at (8) (or create a new one) and then add a ToDoItem to the end of it on line (9).
When the user types /add they see something like this:
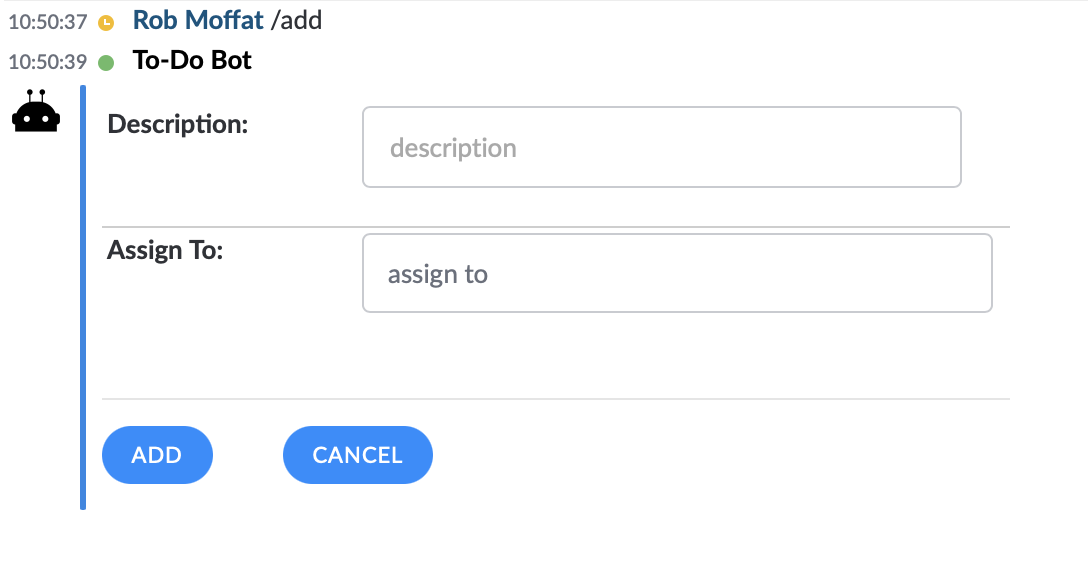
Then, I can fill out the form:
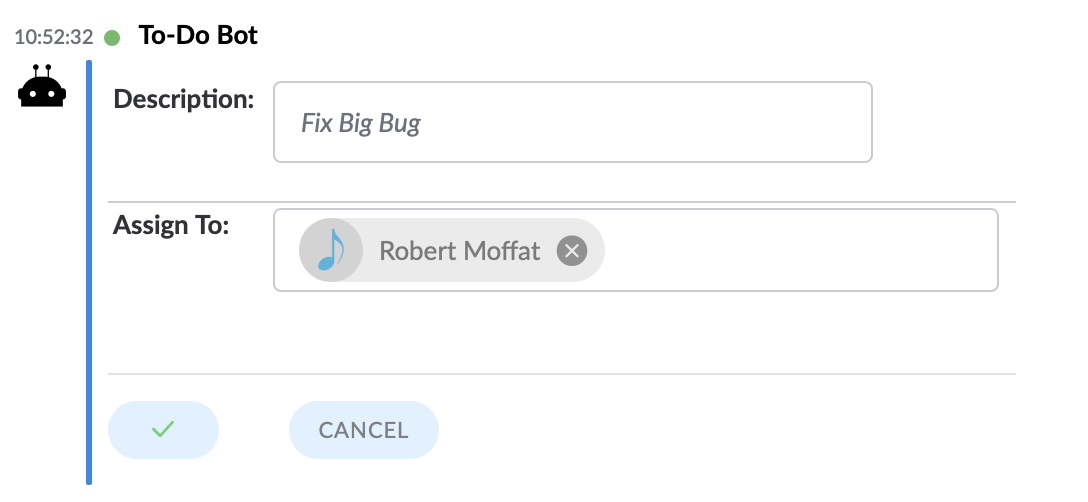
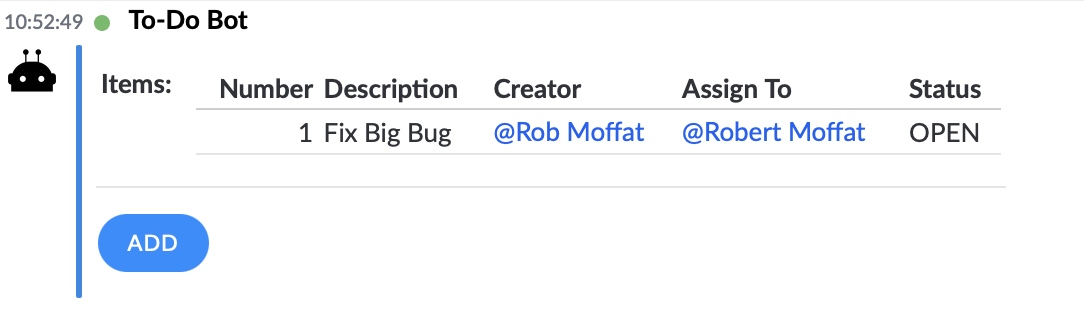
When I press “add” I get a new ToDoList back:
7. Updating The ToDoItems
Here, we’re going to look at the different between WorkMode EDIT and VIEW, and add allow people to change the ToDoList easily.
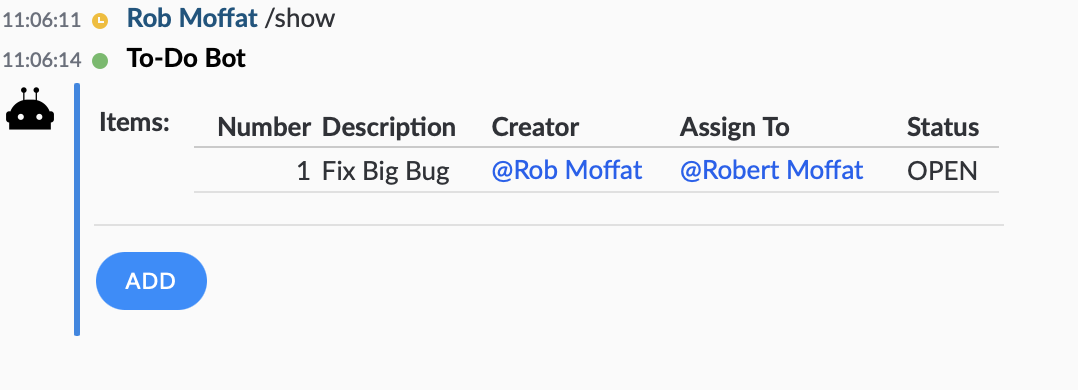
Often, the state of your To Do list gets lost in the history of the chat. It’s nice to be able to recall it at a moment’s notice. For this, we’re going to implement /show:
@Controller
public class ToDoController {

  // existing stuff

  private void reNumber(ToDoList l) {
    int initial = 1;
    for (ToDoItem toDoItem : l.getItems()) {
      toDoItem.setNumber(initial++);
    }
  }

  @ChatRequest(value="show", description = "Show current list of items")
  @ChatResponseBody(workMode = WorkMode.VIEW)
  public ToDoList show(Optional<ToDoList> in) {
    ToDoList out = in.orElse(new ToDoList());
    reNumber(out);
    return out;
  }
The show method above simply returns the ToDoList supplied in the in parameter. Spring Bot is clever enough to find and load this for you if it exists already in the current conversation.
Note also the new reNumber method - we’re going to use this to keep the numbers of the ToDoItems consecutive, even when some get deleted.
This works as shown below. You can see the user types show and receives back the ToDoList.
But we can also return the list in EDIT mode by adding this method:
  @ChatRequest(value="edit", description = "Edit current list of items")
  @ChatResponseBody(workMode = WorkMode.EDIT)
  public ToDoList edit(Optional<ToDoList> in) {
    ToDoList out = in.orElse(new ToDoList());
    reNumber(out);
    return out;
  }
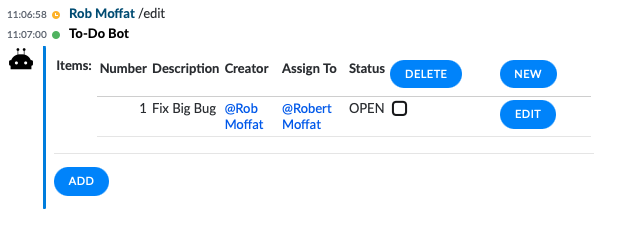
Apart from the name, the difference here is @ChatResponseBody(workMode = WorkMode.EDIT). This instructs the templater to produce a template in EDIT rather than view mode. Spring Bot will manage the logic of the Delete buttons for you, allowing users to delete several rows out of the ToDoList, as shown below:
8. Faster Modification
Form-diving like this isn’t perhaps the fastest way to interact with To-Do Bot. It would be nice to manage the To-Do list more directly. How about:
/delete 1 2 3
/assign 1 2 3 @Robert Moffat
/complete 4 5 6 @Suresh Rupnar
Let’s have a look at /delete first:
@Controller
public class ToDoController {

  // existing stuff

  private Set<Integer> numbers(List<Word> m) {                          (1)
    return m.stream()
      .map(w -> parseInt(w))
      .filter(i -> i != null)
      .collect(Collectors.toSet());
  }

  @ChatRequest(value="delete {item}",                                   (2)
    description = "Remove items by number. e.g. \"/delete 5 6 7\"")
  public ToDoList delete(
      @ChatVariable(name = "item") List<Word> toDelete,                 (3)
      Optional<ToDoList> toDo) {

    ToDoList out = toDo.orElse(new ToDoList());
    Set<Integer> toRemove = numbers(toDelete);
    for (Iterator<ToDoItem> iterator = out.getItems().iterator(); iterator.hasNext();) {
      ToDoItem item = iterator.next();
      if (toRemove.contains(item.getNumber())) {
        iterator.remove();
      }
    }
    reNumber(out);
    return out;
  }
To make delete work we are going to make use of the Content-class hierarchy. These classes are used to hold the contents of the messages sent to the bot in a structured format for easy manipulation in your controller methods.
Word is a type of Content. At (1) we are supplying a helper function to extract Integers from Words, which will give us the numbers of the ToDoItems we wish to delete.
At (2) we are declaring the pattern for the user input that will match this method. {item} is a wildcard, which matches a number of different Words.
This wildcard is bound to the toDelete argument at (3) by the use of the @ChatVariable annotation. This is very much like Spring Web MVC’s @PathVariable annotation. Since toDelete is a List<Word>, Spring Bot knows that the pattern can contain a number of words.
After that, it’s a question of removing the numbered items from the ToDoList and returning it again.
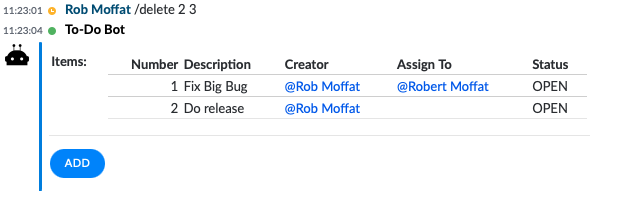
Let’s say we have this ToDoList:
We can issue this command to remove some items:
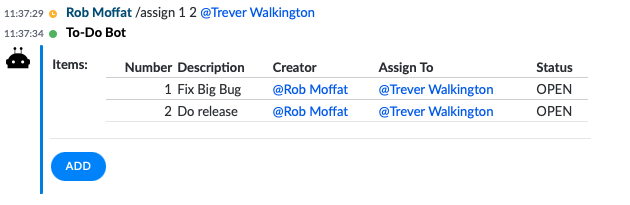
9. Assign / Complete
Let’s do the /assign and /complete commands together, as they work in very similar ways:
  private void changeStatus(ToDoList on, List<Word> words, User u, Status s) {
    Set<Integer> toUpdate = numbers(words);

    on.getItems().stream()
      .filter(i -> toUpdate.contains(i.getNumber()))
      .forEach(i -> {
        i.setAssignTo(u);
        i.setStatus(s);
    });

    reNumber(on);
  }

  @ChatRequest(value="complete {items} {by}",
    description = "Complete items, e.g. \"/complete 1 3 5 @Suresh Rupnar\"")
  public ToDoList complete(
      @ChatVariable("items") List<Word> words,
      @ChatVariable("by") Optional<User> by,
      User a,
      Optional<ToDoList> toDo) {

    ToDoList out = toDo.orElse(new ToDoList());
    User u = by.orElse(a);
    changeStatus(out, words, u, Status.COMPLETE);
    return out;
  }

  @ChatRequest(value="assign {items} {by}",
    description = "Assign items, e.g. \"/assign 1 3 5 @Suresh Rupnar\"")
  public ToDoList assign(
      @ChatVariable("items") List<Word> words,
      @ChatVariable("by") Optional<User> by,
      User a, Optional<ToDoList> toDo) {
    ToDoList out = toDo.orElse(new ToDoList());
    User u = by.orElse(a);
    changeStatus(out, words, u, Status.OPEN);
    return out;
  }
- We are now using two
@ChatVariables for each method -itemsandby. Spring Bot is clever enough to match the rightContent-class instances to the right variables. changeStatus()goes through the items in theToDoListand assigns each one mentioned in the message to theUser uwithStatus s.complete()andassign()both usechangeStatus(). If a user is mentioned, they’ll assign to that user, otherwise, they’ll assign to the person issuing the chat command (i.e. the author,a).
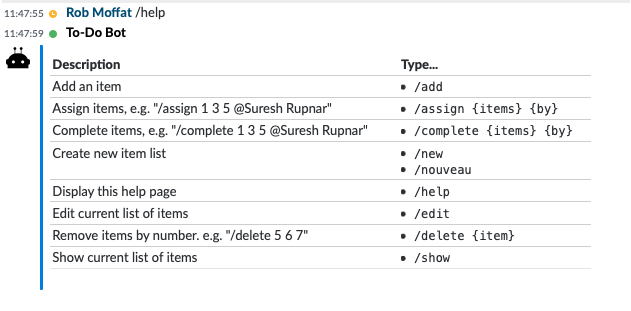
Help
Any @ChatRequests you map in your controller will automatically be added to the bot’s /help command:
Templating
If you don’t like the look of the forms presented, you don’t have to stick with them! Take a look a the Reference, which covers how to customize your templates.
In the stdout/console logging for your bot, you will find sources which you can use as the basis for your templates. e.g.
2020-10-15 17:26:01.339  INFO 21628 --- [ SymphonyStream] c.g.d.s.w.s.s.h.SymphonyResponseHandler  : JSON:
{
  "workflow_001" : {
    "type" : "example.symphony.demoworkflow.todo.toDoList",
    "version" : "1.0",
    "items" : [
      ...
    } ]
  },
  "errors" : {
    "type" : "org.finos.symphony.toolkit.workflow.form.errorMap",
    "version" : "1.0",
    "contents" : { ... }
  },
  "buttons" : {
    "type" : "org.finos.symphony.toolkit.workflow.form.buttonList",
    "version" : "1.0",
    "contents" : [ ... ]
  },
  "header" : {
    "type" : "org.finos.symphony.toolkit.workflow.form.headerDetails",
    "version" : "1.0",
    "name" : "Todo Items",
    "description" : "List of current items",

  }
}
2020-10-15 17:26:01.340  INFO 21628 --- [ SymphonyStream] c.g.d.s.w.s.s.h.SymphonyResponseHandler  : TEMPLATE:
<messageML><card accent="tempo-bg-color--blue">
  <header>${entity.header.name}</header>
  <body>
    <p>${entity.header.description}</p>
    <ul>
      <#list entity.header.tags as tag>
        <li><hash tag="${tag.id}" /></li>
      </#list>
    </ul>
  </body>
</card>

<#-- starting template -->
<table><tr><td><b>items:</b></td><td>
 <span class="tempo-text-color--red">${entity.errors.contents['items']!''}</span>

 <table><thead><tr>
   <td style="text-align: right;"><b>number</b></td>
   <td ><b>description</b></td>
   <td ><b>creator</b></td>
   <td ><b>assignTo</b></td>
   <td ><b>status</b></td>
 </tr></thead><tbody>
 <#list entity.workflow_001.items as iA>
 <tr>
  <td style="text-align: right;">${iA.number!''}</td>
  <td >${iA.description!''}</td>
  <td ><#if iA.creator??><mention
   uid="${iA.creator.id}" /></#if></td>
  <td ><#if iA.assignTo??><mention
   uid="${iA.assignTo.id}" /></#if></td>
  <td >${iA.status!''}</td></tr>
 </#list>
 </tbody></table></td></tr>
</table>
<form
 id="just-buttons-form">
  <p><#list entity.buttons.contents as button>
    <button
         name="${button.name}"
         type="${button.buttonType?lower_case}">
      ${button.text}
    </button>
  </#list></p>
</form>
<#-- ending template -->
</messageML>
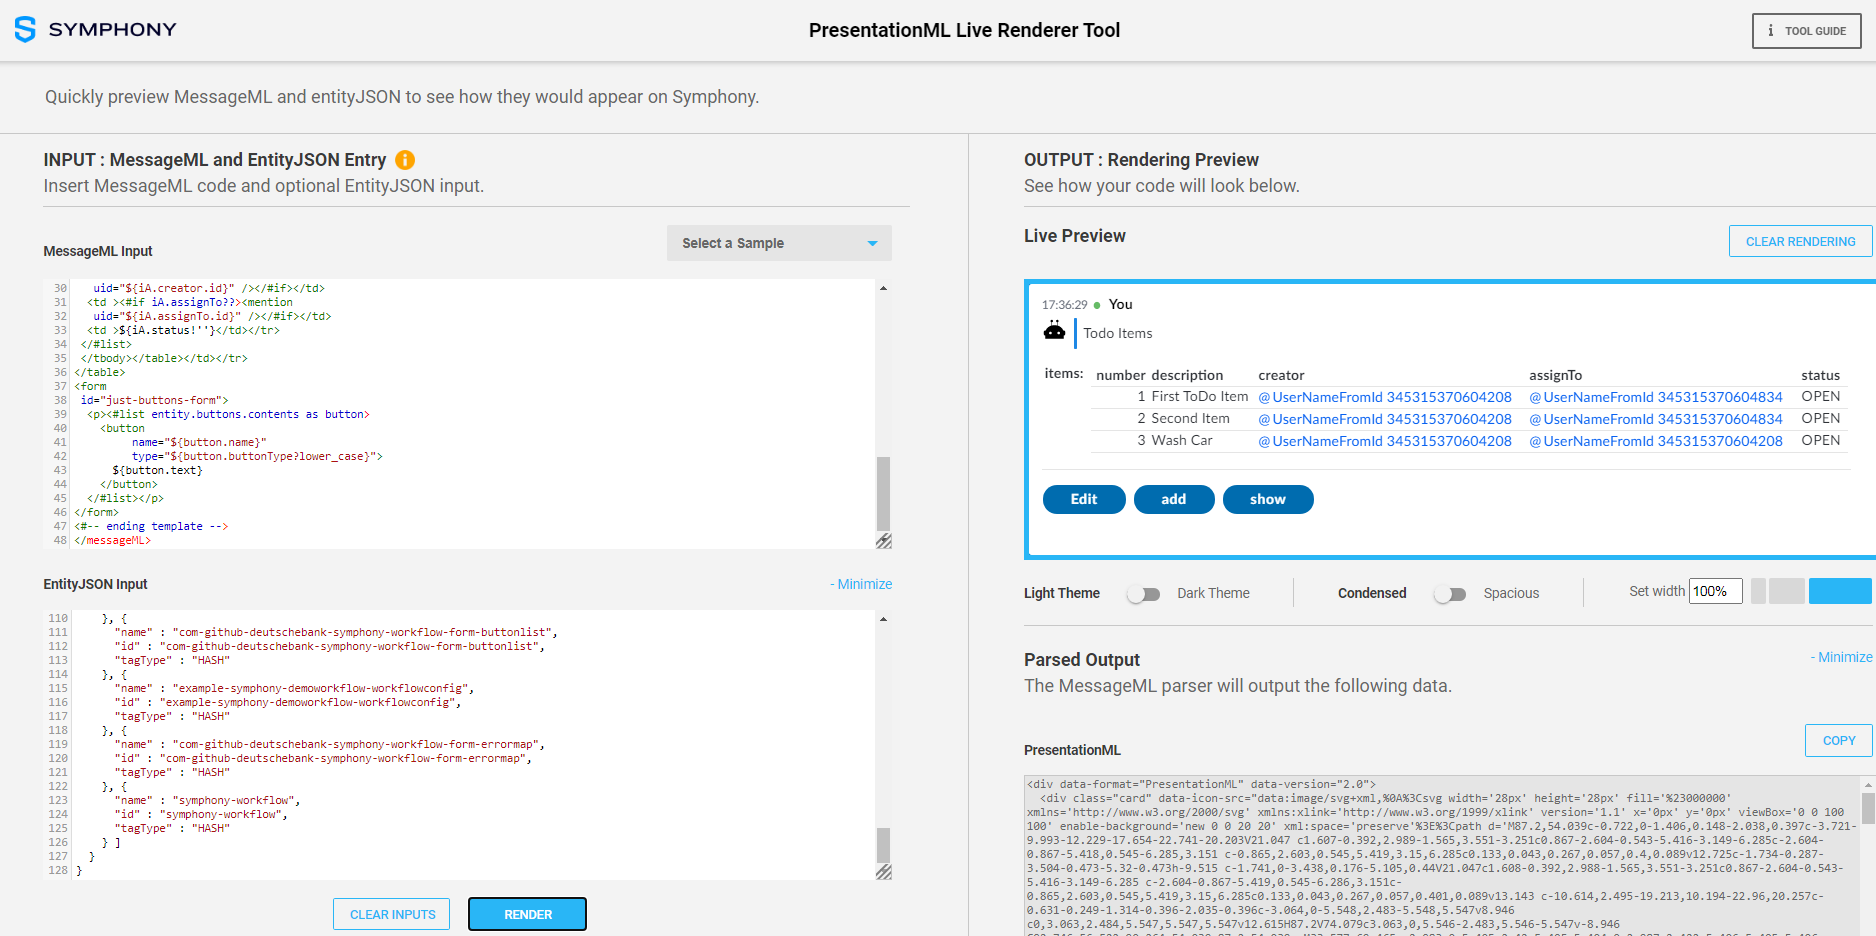
You can load this into the PresentationML editor like this:
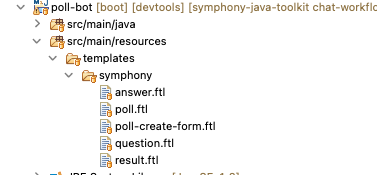
Having done this, you can save the templates into your classpath, like this:
Then, you simply add the @Template annotation to your @Work classes and instead of constructing templates using reflection, Spring Bot will use your pre-defined template instead.
You can see this used quite a lot in the Poll Bot.